How to Replace Pressure Washer Hose End: A Step-by-Step Guide
Learn to replace the pressure washer hose end safely and effectively. This expert guide from Pressure Wash Lab covers compatibility, tools, installation, testing, and maintenance to ensure leak-free connections and lasting performance.

To replace the pressure washer hose end, power off the system, depressurize, then detach the old end and install a compatible replacement with proper sealing. This 2-3 step approach minimizes leaks and spray loss. Always verify compatibility before buying. Follow the steps carefully and test at low pressure first. This quick answer helps you avoid common mistakes and extend hose life.
Why replacing the hose end matters
The hose end on a pressure washer is the primary interface between your machine and the spray nozzle or wand. Over time, O-rings wear, threads corrode, and the coupling can develop micro-leaks. When this happens, you can lose pressure, waste water, and risk sudden disconnections under high velocity. According to Pressure Wash Lab, replacing the hose end at the first sign of wear is a smart maintenance move that helps maintain consistent spray pattern and prevent unexpected hose bursts. The action to replace pressure washer hose end when worn is not optional for homeowners who depend on reliable cleaning results. In this guide, we’ll walk you through choosing a compatible end, gathering the right tools, performing the swap, and verifying the connection. Expect to spend about 25-40 minutes for a typical swap on a standard home setup. We’ll also cover safety steps and tips to maximize the life of your hose assembly. By following these steps, you’ll ensure the new end delivers consistent pressure and a secure fit, reducing downtime and frustration during projects. Pressure Wash Lab’s emphasis on proper end compatibility aligns with best practices for long-term performance.
Understanding compatibility and end types
When you set out to replace pressure washer hose end, the first decision is compatibility. Most hoses and wands use two broad categories: quick-connect (QC) ends and threaded ends. QC fittings snap on and off quickly, making routine swaps easy, while threaded ends rely on screw-fit connections that require a wrench or pliers for secure attachment. Different brands may use metric or standard thread calibers, and some ends are designed for specific hose diameters or PSI ratings. Before you buy, measure the hose diameter and check your machine’s manual to confirm the correct end type. Pressure Wash Lab recommends documenting the exact model of your pressure washer and hose, then matching the replacement end to that spec. If you can’t find a direct match, look for adapters from reputable manufacturers that preserve sealing integrity and maintain safe operation. The goal is a snug, leak-free seal that can withstand the expected psi and spray pattern for your typical projects.
To avoid the common pitfall of incompatibility, always double-check the end style and size. A mismatched end can cause leaks, reduced performance, and sudden detachment at high pressure. Keep a small log of end types for each hose in your shop so you can quickly determine compatibility when you replace pressure washer hose end next time. For DIYers, choosing a replacement end that matches your existing connector style is often the simplest path to a successful swap.
Safety first: depressurize and prep
Safety is non-negotiable when replacing the hose end. Start by turning off the pressure washer and unplugging it from any power source. Engage the trigger spray wand to vent residual pressure until the water flow stops. Wear safety glasses and gloves to guard against accidental sprays or sharp fittings. Before you touch any fittings, confirm that the system is fully depressurized. If your unit has a built-in pressure release control, use it according to the manufacturer’s directions. Preparing a clean, dry workspace helps prevent slips and makes it easier to see threads and O-rings. Have towels handy to catch any remaining water and a marker to label the end type and size for future reference. By taking these precautions, you’ll minimize the risk of injury and damage while you replace pressure washer hose end.
Removing the old end and preparing the hose
With the system fully depressurized, inspect the old end for signs of wear, corrosion, or damaged O-rings. If the end is snapped on with a clamp, use the appropriate tool to loosen and remove the clamp, then detach the end from the hose or wand. For threaded ends, grip the fitting with an adjustable wrench or channel-lock pliers and rotate counterclockwise to unscrew. If resistance is high, apply a small amount of penetrating oil around the threads and wait a minute before retrying. Avoid twisting the hose itself, which can compromise the hose structure. Once the old end is free, wipe down the hose end to remove residual debris and check the exposed threads or the quick-connect collar for damage. Having the old end removed sets you up for a clean, accurate installation of the new end. As you prepare, keep track of any O-rings or seals that come with the replacement end; these are critical for a proper seal and long service life.
Installing the new end correctly
Begin by confirming the replacement end is the exact type and size for your hose. If you’re using a threaded end, wrap the male threads with PTFE thread seal tape to improve sealing, then thread the end by hand to alignment. Use a wrench to tighten to a snug finish; avoid over-tightening which can strip threads or deform seals. If you’re using a quick-connect end, push the end firmly into the hose or wand until it clicks into place, then pull back slightly to verify a secure fit. After the end is attached, inspect the seal area to ensure no gaps exist and that the O-ring seats properly. For best results, apply a small amount of silicone-compatible lubricant to the O-ring if provided. This step helps the end seat evenly and reduces wear over time. Finally, visually verify that the end is aligned with the hose and wand for an even spray pattern once you test it. Replacing a pressure washer hose end with the correct technique yields a reliable seal and optimal spray performance.
Testing, troubleshooting, and leak checks
With the new end installed, restore power and gradually pressurize the system. Start at the lowest pressure setting and trigger the wand to verify seals while monitoring for leaks at the connection. If you observe a leak around the end, tighten the fitting slightly by turning clockwise for threaded ends or reseat a quick-connect if necessary. If a leak persists after a standard snug, disassemble and re-check the O-ring seating and thread alignment. For a robust test, spray against a clean, dry surface and observe any drops of water that indicate a slow leak. If leaks occur during high-pressure use, recheck seating and consider replacing the O-ring or entire end if the seal remains compromised. Regular leak checks after replacement help maintain pressure consistency and extend hose life. By following these tests, you’ll confirm a solid replacement of the hose end and reduce downtime on future projects. Pressure Wash Lab’s approach emphasizes careful inspection and testing to avoid surprises.
Maintenance tips to extend hose-end life
To maximize the life of your replacement hose end, store hoses on a reel or in a coiled, kink-free configuration. Keep the end assemblies clean and dry when not in use, and inspect O-rings for cracking or wear every few uses. Use minimal force when connecting ends; avoid cross-threading by hand-adding alignment before tightening. When you notice stiffness or resistance during connection, do not force it—the end may be damaged or misaligned. Periodically lubricate the O-rings with a silicone-safe lubricant (if recommended by the end’s manufacturer) to reduce friction and wear. If you frequently swap ends, mark the orientation on the hose for quick alignment next time. Practice good storage and routine inspection; you’ll improve reliability and reduce the chance of leaks when you replace pressure washer hose end in the future. Pressure Wash Lab encourages homeowners to adopt a simple maintenance routine to protect investments and keep a clean, efficient workflow.
Common mistakes and quick safety recap
Common mistakes when replacing a hose end include selecting an incompatible end, cross-threading, over-tightening threaded connections, and skipping a leak test. Always double-check the end type and size before purchase, and refrain from forcing a connection. Never operate the unit with a damaged end or exposed threads; always depressurize first and wear safety gear. A quick visual check after installation helps ensure the O-rings and seals are seated correctly. Remember the key goal: a secure, leak-free connection that maintains recommended pressure and spray quality. Pressure Wash Lab’s practical guidance is to stay methodical and patient during the swap, because a sloppy end swap can lead to failures during use. The ultimate aim is safety, reliability, and efficiency in every project, and that starts with a proper replacement of the hose end.
Tools & Materials
- Replacement hose end fitting (compatible with your hose)(Choose matching type (quick-connect vs threaded) and size to your hose and wand.)
- Adjustable wrench(For threaded ends; avoid overtightening.)
- Channel-lock pliers(Use if extra bite is needed on stubborn fittings.)
- PTFE thread seal tape(Useful for threaded ends to improve sealing.)
- Rags or shop towels(Keep area clean to inspect seals; absorb residual water.)
- Safety gloves(Protect hands during fastening and cleaning.)
- Safety goggles(Eye protection when working near spray or fittings.)
- Replacement O-rings (if included with end)(Have on hand in case you need a fresh seal.)
- Marker or tape(Label end type for future reference.)
Steps
Estimated time: 25-40 minutes
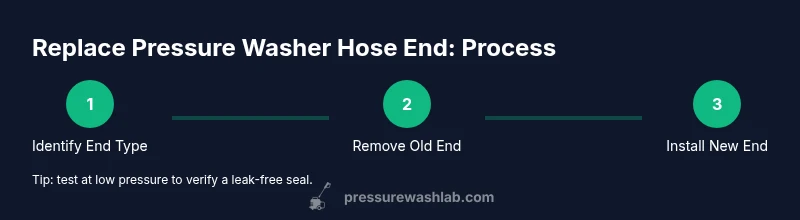
- 1
Power off and depressurize
Shut down the pressure washer, unplug the power, and discharge stored pressure by pulling the trigger until the wand sprays water freely. This prevents sudden releases and reduces slip hazards.
Tip: Always unplug before touching any fittings to avoid shock or unexpected sprays. - 2
Identify end type
Check whether your hose uses a quick-connect or threaded end, and note the size. Confirm compatibility with the replacement end by comparing with the hose diameter and wand connection.
Tip: If in doubt, consult the user manual or contact the manufacturer for exact end specifications. - 3
Remove the old end
Loosen any clamps and unscrew the end if threaded. If it’s a quick-connect, twist and pull the end free until it disengages. Keep track of any O-rings or seals.
Tip: Do not yank; apply steady, even pressure to avoid damaging the hose cuff. - 4
Prepare the new end
Inspect the replacement end for damage. If using threads, apply PTFE tape to the male threads to improve sealing, and align the end with the hose.
Tip: Ensure you’re rotating in the correct direction to avoid cross-threading. - 5
Attach the new end
Screw the end by hand to alignment, then snug it with a wrench without overtightening. For quick-connect, push until it clicks and gently tug to confirm.
Tip: Check that the coupling sits flush against the hose or wand to ensure a reliable seal. - 6
Seal and inspect
Visually inspect the joint for gaps, misalignment, or damaged O-rings. If you see any issue, disassemble and re-seat the end.
Tip: Replace any worn O-rings before final assembly. - 7
Test at low pressure
Power on, run at a low pressure setting, and trigger the wand to test for leaks. Increase pressure gradually and monitor the connection.
Tip: If a leak appears, power down and recheck seating rather than forcing the end. - 8
Final checks and cleanup
Wipe down the area, store tools, and re-check after a short test run. Document the end type for future maintenance.
Tip: Keep a small log of end types and replacements for quick future references.
Quick Answers
Can I replace the hose end myself?
Yes. With basic hand tools and the right replacement end, you can perform the swap safely. Follow a clear step-by-step process and verify compatibility before use.
Yes, you can replace the hose end yourself with basic tools and a compatible end. Just follow the steps and test for leaks.
What if the replacement end isn’t compatible?
If there’s no exact match, look for an adapter or contact the manufacturer for an approved solution. For safety, do not force an end that doesn’t fit.
If the end isn’t compatible, use an approved adapter or contact the manufacturer. Do not force a mismatch.
Do I need thread seal tape?
Use thread seal tape only on threaded connections that require sealing. QC connectors generally don’t need tape. Verify the end type before applying any sealant.
Thread seal tape is only for threaded ends; quick-connects usually don’t need it. Verify your end type first.
How can I tell the correct size of the hose end?
Measure the hose diameter and check the wand connection. Refer to the machine manual or manufacturer specs for the exact end size and thread type.
Measure the hose diameter and check the wand connection, then consult the manual for exact size and thread type.
Is it better to replace the entire hose?
If the hose shows cracks, crusting, or significant wear beyond the end, replacing the entire hose may be safer and more cost-effective in the long run.
If the hose is worn beyond the end, replacing the whole hose may be wiser.
How long does replacement take for a beginner?
Most beginners complete the swap in 20-40 minutes, depending on end type and access. Allow extra time for troubleshooting.
Beginners typically spend 20-40 minutes, depending on end type and access.
Watch Video
Key Takeaways
- Identify the correct end type before purchase.
- Depressurize and unplug before starting.
- Tighten connections by hand, then snug with a tool.
- Test for leaks at low pressure first.
- Maintain the hose end to extend life.