Sun Joe Pressure Washer How To Use: Step-By-Step Guide
Learn step-by-step how to use a Sun Joe pressure washer safely and effectively. This guide covers setup, nozzle tips, maintenance, and troubleshooting to help homeowners and DIY enthusiasts clean efficiently without damage.

This guide shows you how to use a Sun Joe pressure washer safely and effectively. You’ll learn how to set up, choose nozzles, protect surfaces, and perform routine maintenance to extend the unit’s life. By following the steps, you’ll clean patios, siding, and concrete without damage, while minimizing water waste and strain.
Getting oriented: what you can accomplish with this Sun Joe guide
According to Pressure Wash Lab, homeowners and DIY enthusiasts can confidently learn sun joe pressure washer how to use its features and safety steps by following a structured guide. This article walks you through setup, nozzle selection, cleaning techniques, and routine maintenance so you can tackle patios, siding, driveways, and other exterior surfaces without causing damage. The goal is not just to blast grime away, but to do it efficiently, safely, and with minimal water waste. You’ll find practical tips, common-sense warnings, and a clear path from unboxing a Sun Joe to storing it after a job. By the end, you’ll know how to set up the unit, choose the right spray pattern, maintain your equipment, and troubleshoot issues that might come up on the job. If you’re new to pressure washing, start with low pressure on delicate surfaces and gradually increase as you gain confidence. The Sun Joe platform offers several models, but the fundamental steps remain the same. sun joe pressure washer how to use this equipment when done correctly delivers dramatic results with less effort.
Model basics and requirements
Before you power up, understand the basic requirements of your Sun Joe pressure washer. Most Sun Joe electric units require a standard outdoor outlet and a clean, steady water supply. Check your model’s manual for minimum flow rate, compatible detergents, and any model-specific restrictions. Prepare a scene that won’t trap you in a corner—park on a flat surface, remove obstacles, and ensure you have a stable hose connection. Inspect the high-pressure hose for cracks, and verify that the spray wand snaps securely onto the wand head. If your unit has a built-in chemical reservoir, confirm its capacity and whether you’ll be using a separate detergent bottle. Understand the available nozzle options included with your model, as different tips produce different spray patterns and cleaning power. As you plan a job, estimate the area to clean, the material you’re cleaning, and the level of embedded grime. This pre-job planning saves time and prevents accidental damage by letting you select the correct nozzle and pressure range in advance.
Safety and prep: water source, power, and cords
Safety first when operating any pressure washer. Always connect to a clean, properly grounded power source (preferably a GFCI outdoor outlet) and never power the unit from an indoor extension or damaged outlet. Use a garden hose rated for outdoor use to supply water, and keep the hose free of kinks. Wear protective eyewear and gloves, and avoid pointing the wand at people, pets, or fragile surfaces. Check the area for obstacles and make sure weather conditions won’t cause slipping. If you’re using detergent, ensure it’s compatible with your Sun Joe model and follow dilution guidelines. Do not leave the machine unattended while powered, and always release built-up pressure when disconnecting hoses.
Nozzle selection and spray patterns
Your Sun Joe model typically includes multiple nozzle tips that determine spray angle and cleaning power. Common patterns include wide, low-pressure sprays for delicate surfaces and narrow, high-pressure streams for stubborn grime. Start with the widest angle to establish distance and coverage, then move to narrower angles as needed. Different surfaces require different approaches: use gentler angles on siding and wood, and avoid close contact with soft or painted materials. When changing nozzles, ensure the unit is off and disconnected from power before attaching or detaching tips. Always test on a small inconspicuous area to verify that the spray does not cause damage before continuing.
Step-by-step start-up and basic operation
In practice, you’ll begin with unpacking and setup, then connect to a water source, attach the desired nozzle, and power on the unit to purge air from the line. Hold the wand with a firm grip and squeeze the trigger to release trapped air, observing a steady, controlled spray before targeting any surface. Move the wand in smooth, overlapping passes rather than a single long stroke to avoid streaks or missed patches. Keep the spray at a safe distance and never use full power on fine finishes or fragile materials. If you notice reduced performance, check hoses for leaks and ensure the water inlet is not clogged. Always end by releasing pressure and powering off before disconnecting attachments.
Techniques for cleaning different surfaces
Different surfaces tolerate different pressures and distances. For concrete and brick, you can use higher pressure at a moderate distance and work in a systematic, overlapping pattern. For wood decks or siding, start with the widest spray and the farthest distance to avoid gouging or splintering. Always test first to gauge surface response, and use slower, controlled sweeps across the area. For vehicles or metal surfaces, use low pressure and a compatible detergent if needed to prevent streaks and etching.
Maintenance and storage after use
After you finish a job, flush the system with clean water to remove residual detergent and debris. Squeeze the trigger to release any remaining pressure, then unplug the unit and disconnect the hoses. Rinse the spray wand and nozzle, then dry all fittings before storage to prevent corrosion. Store the unit in a dry, cool location and protect it from freezing temperatures if you are in a cold climate. Periodically inspect hoses and connections for wear, and replace damaged parts promptly. Regular maintenance reduces the likelihood of leaks and extends the life of your Sun Joe pressure washer.
Troubleshooting common issues
If you notice low pressure, inspect the inlet water supply, check for clogs in the nozzle, and confirm the nozzle is not damaged. Leaks around connectors often indicate loose fittings or cracked hoses that require tightening or replacement. If the unit won’t start, verify that the outlet is live, the reset button (if provided) hasn’t tripped, and there’s no air trapped in the system. For performance issues, consult the manual for model-specific troubleshooting steps. When in doubt, contact support or consult the Sun Joe customer service resources for guidance.
Final checks and safety reminders
Before leaving the job, perform a quick safety sweep: ensure there are no tripping hazards, protect delicate plants and surfaces, and verify that every attachment is secured. Remember to drain any residual water and allow components to dry before storing. Regularly review the manufacturer’s guidelines for your specific Sun Joe model, and never exceed recommended nozzle pressures on soft materials. Adhering to these practices helps you maintain performance and safety over time.
Tools & Materials
- Sun Joe pressure washer unit(Model-specific manual available; ensure model matches your setup)
- Garden hose (outdoor rated)(Ensure water flow is adequate and clean)
- Outdoor extension cord (13A+ or 14 AWG)(GFCI outlet recommended; use weather-rated cord)
- Safety glasses and work gloves(Eye protection required during operation)
- Nozzle tips (0°, 15°, 25°, 40°)(Attach securely to spray wand)
- Detergent (optional, model-compatible)(Only if your model supports it; follow dilution guidelines)
- Flat test surface (optional)(Use inconspicuous area first)
Steps
Estimated time: 30-45 minutes
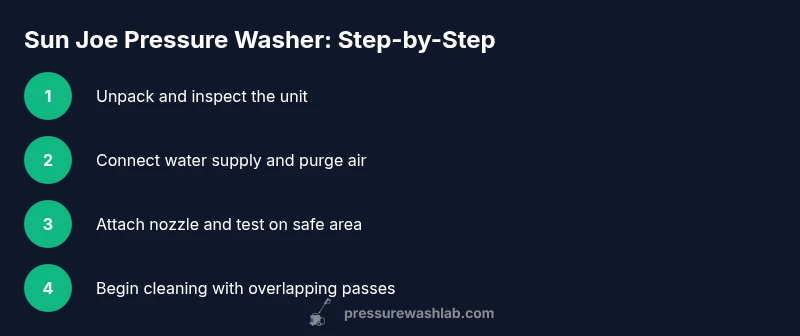
- 1
Unpack and inspect
Remove the unit from its box and inspect all components for shipping damage. Check hoses, wand, and fittings for cracks or wear. Read the manual to understand model-specific safety notes and nozzle options before first use.
Tip: Take a quick photo of the setup as a reference for reassembly or future servicing. - 2
Connect water supply and prime
Attach the garden hose to the water inlet, ensure faucets are fully open, and run water through the system to purge air. Do not power on until you confirm water flow is steady and there are no leaks.
Tip: Open the faucet fully before turning on the unit to prevent dry-running the pump. - 3
Attach nozzle and power on
Choose the appropriate nozzle for the job and securely attach it to the wand. Plug the unit into a grounded outdoor outlet and flip the switch, then squeeze the trigger to purge air.
Tip: Start with the widest spray angle to test distance on a safe area. - 4
Test spray on a small area
Aim at an inconspicuous spot and sweep across the surface with steady, overlapping passes. Check for surface reaction and adjust distance or nozzle as needed.
Tip: Keep the wand perpendicular to the surface to avoid gouging. - 5
Begin cleaning the main area
Move the wand in consistent, overlapping strokes, maintaining an appropriate distance to avoid damage. Treat heavily soiled zones with longer passes rather than aggressive pressure.
Tip: Work from top to bottom for exterior siding to prevent dirty runoff from marring cleaned sections. - 6
Shut down and store
Release residual pressure, unplug the unit, disconnect hoses, and drain any remaining water. Rinse detachable parts and dry before storage; store in a dry, cool place away from freezing temperatures.
Tip: Never store with water inside hoses; this can lead to mold and hose damage.
Quick Answers
Do I need to use detergent with my Sun Joe pressure washer?
Detergent can improve cleaning on some surfaces; only use model-compatible detergent and follow dilution guidelines. Not all Sun Joe models support detergent without a foam cannon.
Detergent can help on tough grime if your model supports it; check your manual and use the right product.
Can I use a Sun Joe pressure washer on wood decks?
Yes, but use the widest nozzle at a greater distance to avoid splintering. Test on a hidden area first and avoid continuous high-pressure bursts on untreated wood.
You can, but start far away and move slowly to protect the wood.
What surfaces should I avoid with high pressure?
Avoid high pressure on painted, stained, or delicate surfaces. Test first and prefer wider-angle nozzles for fragile materials.
Test first and use wide angles on fragile surfaces.
What should I do if the unit won’t start?
Check that the outlet is live, the power cord is intact, and there’s no air trapped in the system. Consult the manual for model-specific troubleshooting.
Make sure it’s plugged in and there’s water in the line, then test again.
How do I store a Sun Joe after use?
Drain water from hoses, purge the system, and store in a dry place away from freezing temperatures.
Drain and dry everything before putting it away.
How often should I inspect hoses and fittings?
Inspect hoses and fittings before each use and after heavy cleaning sessions to prevent leaks and failures.
Check for wear every time you plan a job.
Watch Video
Key Takeaways
- Plan the job and select the correct nozzle before starting.
- Always verify water supply and safety gear prior to operation.
- Use overlapping, controlled passes for even cleaning.
- Proper post-use maintenance extends equipment life.