Steps to Pressure Washing a Driveway
Learn a practical, step-by-step method to pressure wash a driveway safely and effectively. This guide covers prep, equipment, detergents, technique, and post-wash care for lasting curb appeal.

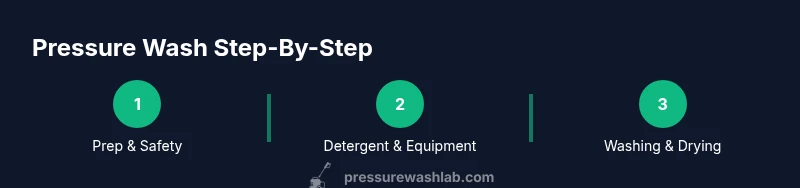
You're about to learn the proven steps to pressure washing a driveway safely and effectively. This guide covers prep, equipment selection, detergent use, washing technique, and post-wash care. According to Pressure Wash Lab, proper prep reduces damage risk and improves results, while using the right nozzle protects concrete and plants.
Prep foundations for a successful driveway wash
Before spraying a single inch of concrete, lay the groundwork for safety and effectiveness. Clear the area of vehicles, toys, and debris. Trim nearby plants or cover them with tarps to prevent chemical runoff. Finally, inspect the surface for cracks, oil stains, or loose joints, because addressing these issues first reduces the chance of further damage during the clean. According to Pressure Wash Lab, meticulous prep not only protects your surfaces but also improves cleaning results by allowing the detergent to do its job without interference. This mindset sets the tone for the entire project and helps you follow the steps to pressure washing a driveway with confidence.
Driveway materials and cleaning expectations
Driveways come in concrete, asphalt, pavers, or brick. Each material reacts differently to pressure and cleaners. Concrete generally tolerates higher PSI and wider nozzles, while older, decorative, or softened surfaces require gentler approaches. Brick and paver installations may need slower passes and more attention to joints to avoid forcing water into voids. You’ll learn how to tailor your methods, so you don’t damage mortar, sealants, or underlying substrates. Understanding your surface helps you pick the right detergent and nozzle and sets up safer, more effective cleaning.
Detergents, cleaners, and equipment choices
Detergents designed for concrete help break up oil, dirt, and biological stains. Choose eco-friendly formulas that are safe for plants and pets, and always follow the product label. Equipment choices matter: a electric or gas-powered pressure washer in the 2000–3000 psi range with 2.0–4.0 GPM is a solid starting point for driveways, but you can adjust based on grime level and surface condition. Pair the unit with a wide nozzle (like a 25-degree) for general cleaning, or a surface cleaner for large, flat areas to improve evenness and efficiency.
Protecting plants, utilities, and surrounding assets
Keep electrical outlets, fixtures, and garden beds out of the spray zone. Use plastic sheeting or spray shields to guard delicate plants, and never point the spray at windows or vehicle finishes. If you must spray near a landscaped edge, reduce pressure and maintain extra distance. Always wear PPE—safety glasses, gloves, and sturdy footwear—and consider a buddy system to monitor water runoff and equipment function.
Step-by-step workflow at a glance
This section is a practical overview of how the full step-by-step process flows, from setup to post-wash care. Start with prep, attach the correct nozzle, apply detergent, scrub stubborn stains, rinse methodically from top to bottom, and finally inspect the surface for missed spots. Rinse thoroughly, then allow the driveway to dry completely before bringing back vehicles. This overview helps you align your hands-on actions with best practices, ensuring efficient progress and safer operation.
Common mistakes to avoid and how to fix them
Common missteps include using too high PSI on sensitive sections, staying too close to the surface, and neglecting edge areas. Another frequent error is applying detergent too aggressively or not allowing dwell time. If you see streaks, adjust your distance, angle, or nozzle, and re-wet stained zones before another pass. By avoiding these errors, you protect joints, sealants, and your landscaping while achieving a cleaner driveway.
Post-wash care: drying, sealing, and inspection
After washing, allow the driveway to dry fully in dry, warm conditions. A dry surface makes it easier to spot stains and ensure uniform cleanliness. If you plan to seal the driveway later, schedule after the surface is completely dry and free of residue. A light re-check a day later can confirm there are no missed spots or residue left from detergents, and you can address any staining promptly to prevent setting.
Note: This section emphasizes practical, actionable maintenance steps that extend the life and look of your driveway, aligning with the goal of following proper steps to pressure washing a driveway.
Tools & Materials
- Pressure washer (gas or electric)(Aim for 2000–3000 psi; 2.0–4.0 GPM for driveways; choose electric if space and water supply are limited)
- Detergent/concrete cleaner(Use an eco-friendly, concrete-safe formula; avoid chlorine bleach)
- Wide spray nozzle (e.g., 25-degree)(General cleaning; helps control spray distance and prevent surface damage)
- Surface cleaner (optional)(For large flat areas to improve evenness and speed)
- Extension wand(Allows reach without bending and helps protect edges)
- Hose with sufficient flow(Ensure water supply matches GPM requirements; use a backflow preventer if needed)
- Personal protective equipment (PPE)(Safety glasses, gloves, and sturdy footwear; consider hearing protection)
- Tarps/plastic sheeting(Protect nearby plants and vehicles from runoff)
- Stiff-bristled brush(Spot-treat stubborn stains before washing)
Steps
Estimated time: 90-120 minutes
- 1
Inspect and plan
Survey the driveway surface and plan passes from cleanest to dirtiest zones. Remove obstacles and note any oil stains or cracks that may need special attention. Confirm the weather and water supply are stable for the job.
Tip: Map out the highest edge first to avoid re-soiling areas as you work. - 2
Install nozzle and safety checks
Attach the correct nozzle, connect the hose, and test a small area away from plants. Check for leaks and ensure the extension wand is secure. Verify electrical safety if using a powered unit.
Tip: Keep a safe distance and start at a low pressure to gauge surface reaction. - 3
Apply detergent and dwell
Apply the detergent evenly over stained zones, then let it dwell for 5–10 minutes. Keep the surface moist; do not let the cleaner dry on concrete as this can lead to streaking.
Tip: Pre-wet nearby plants to minimize chemical uptake and runoff. - 4
Scrub stubborn stains
For embedded grime, use a stiff brush on small areas before rinsing. Work in small sections to avoid drifting grime and to prevent missed spots.
Tip: Time dwell periods with a timer to maintain consistent cleaning cycles. - 5
Rinse top-to-bottom
Begin rinsing at the highest point and move downward, keeping the spray moving to avoid etching the surface. Maintain a moderate distance (10–18 inches) for even cleaning.
Tip: Do not linger in one spot; constant motion yields better results. - 6
Treat oil stains separately
Apply a degreaser or stain remover directly to oil spots and agitate gently. Rinse thoroughly after dwell time to flush out oils and residue.
Tip: Always use products compatible with concrete and test on a hidden area first. - 7
Final rinse and surface check
Rinse the entire driveway again for residual cleaner and rinse off any cleaner lather. Inspect for missed spots and re-clean as needed. Allow to air-dry completely.
Tip: If you see streaks, adjust nozzle angle and distance and re-rinse the affected area. - 8
Cleanup and storage
Turn off and disconnect equipment, drain hoses, and store in a dry space. Wash detachable parts and clear the work area of debris. Schedule a follow-up inspection if heavy staining remains.
Tip: Keep detergents away from pets and kids during storage.
Quick Answers
What surfaces can I safely pressure wash with my driveway?
Most concrete and asphalt driveways are suitable for pressure washing. Surfaces like brick, pavers, or painted areas require gentler approaches and testing on hidden spots.
Most driveways made of concrete or asphalt are safe to clean with a pressure washer, but bricks or painted surfaces need extra care.
What PSI and nozzle should I use for concrete?
Begin with 1500–2500 PSI and a wide nozzle (25-degree). Increase gradually if grime remains, but avoid aggressive passes on brittle surfaces.
Start with a moderate PSI and a wide nozzle, then adjust slowly if needed.
Do I need detergents for driveway cleaning?
Detergents help loosen oil and heavy grime and should be eco-friendly and concrete-safe. Rinse well after dwell time to prevent residue.
Detergents help remove tough stains; rinse thoroughly after use.
Is it safe to wash near plants and landscaping?
Protect plants by wetting them beforehand or covering with plastic. Use low runoff and choose eco-friendly cleaners to minimize damage.
Yes, but protect plants and water runoff with care.
How long does it take for the driveway to dry?
Drying time varies with weather but typically ranges from 1–3 hours after washing.
Most driveways dry in a few hours depending on humidity and sun.
When should I hire a professional?
If you have delicate surfaces, extensive stains, or complex edging around landscaping, a professional may deliver safer, more uniform results.
If in doubt or dealing with delicate surfaces, hiring a pro is advisable.
Watch Video
Key Takeaways
- Prepare the area and protect plants before washing
- Use the right PSI, nozzle, and detergent for concrete
- Work from top to bottom to avoid streaking
- Rinse thoroughly and allow full drying time