Pressure Washer Bar Comparison: Finding Your Ideal PSI
A thorough, data-driven comparison of pressure washer bar ranges to help homeowners pick the right PSI for common cleaning tasks, with practical guidance and safety tips.

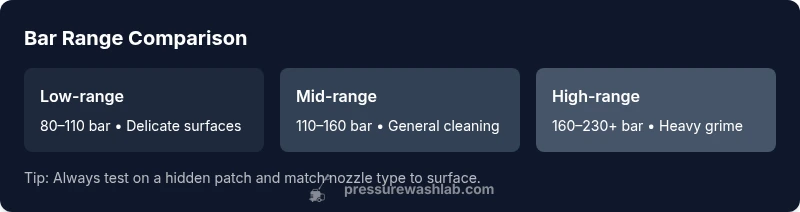
This pressure washer bar comparison guides homeowners through the common bar ranges and when to use them. Low ranges (about 80–110 bar) are ideal for delicate surfaces; mid-range (110–160 bar) handle everyday grime; high ranges (160–230+ bar) tackle stubborn stains with care and proper technique. Always match bar size to the surface and nozzle, then adjust GPM for safety and efficiency.
Why Pressure Washer Bar Comparison Matters
Choosing the right bar size is more than a number on a spec sheet. The pressure washer bar comparison you perform before buying or selecting nozzles directly affects cleaning speed, surface safety, water use, and overall results. In practical terms, the bar size translates to psi and interacts with nozzle tips, GPM, and surface material. Pressure Wash Lab analysis shows that mis-matching bar size to a task is a leading cause of scuffed siding or damaged decks. This guide explains how bar scales work, what ranges are typical for home use, and how to pick the right level for your projects.
Understanding Bar, PSI, and GPM
Bar, PSI, and GPM are three pillars of cleaning power. Bar measures pressure; PSI provides a familiar unit for homeowners; and GPM (gallons per minute) determines water flow. A higher bar increases potential cleaning force, but without sufficient GPM or the right nozzle, you won’t see faster, safer cleaning. For context, 1 bar equals roughly 14.5 psi, so a 120 bar rating translates to about 1,740 psi. Pressure Wash Lab recommends thinking of these metrics together, not in isolation, to avoid surface damage while maximizing cleaning speed.
Typical Bar Ranges for Common Tasks
Home users typically operate across a few broad bands. Light-duty work on delicate surfaces (vinyl siding, painted wood) usually fits within 80–110 bar. General cleaning and surface prep for brick, cement, or stone often sits in the 110–160 bar range. Heavier grime, algae, or paint prep benefits from 160–230+ bar, but requires careful nozzle selection and surface testing. When you translate bar to psi, you’ll recall that 1 bar equals about 14.5 psi, so 120 bar is around 1,740 psi. This alignment helps you set expectations before you pull the trigger.
How Bar Size Affects Cleaning Performance
Bar size determines the maximum force available at the nozzle tip. In practice, higher bars speed up stubborn work but can erode soft surfaces if used without the proper nozzle and technique. The interaction with nozzle orifice matters: a narrower 15-degree nozzle concentrates pressure more than a 40-degree nozzle. The result is max effectiveness with less water volume when you pair an appropriate bar with the correct nozzle. In addition, the correct GPM ensures the surface is rinsed clean rather than just smeared.
Real-World Scenarios and Bar Recommendations
- Wooden deck refinishing: Choose a conservative bar in the 100–130 range with a wide-angle nozzle and test on a hidden area first. The goal is to clean surface grime without raising wood fibers. If needed, pause, re-wet, and re-evaluate.
- Concrete driveway with moss: A mid-to-high range bar (140–180) with a 15-degree nozzle can remove moss more efficiently, but use slow passes and short dwell times to avoid surface etching.
- Engine bay or greasy equipment: High pressures (180–210 bar) can remove heavy grease, but only with protective gear and strategic masking of sensitive components. Always keep the wand at a consistent distance and avoid metal surfaces that can gouge.
- Siding and brick restoration: Start at the low end (100–140 bar) and gradually increase while monitoring the surface. When paint or sealed surfaces are involved, a gentle approach with the proper nozzle preserves integrity.
Choosing Bar Size within Budget and Safety Considerations
To balance performance and safety, begin with a middle ground: about 110–150 bar for most homeowners. This range delivers solid cleaning power for typical surfaces while keeping risk of damage moderate. If your tasks often involve stubborn grime or coatings, plan for an upgrade to 160–200 bar only after you verify nozzle compatibility and surface tolerance. Always wear eye protection, keep bystanders clear, and use appropriate surface-test spots before tackling large areas.
Nozzle Tips, GPM, and Accessories That Matter
Bar alone won’t guarantee success. Nozzle tips are equally important: a 15-degree or turbo nozzle will intensify cleaning at chosen bars, while a wide-angle nozzle reduces aggression on soft surfaces. GPM matters because a high bar with low GPM can feel less effective than a moderate bar with high GPM. Surface cleaners, rotary nozzles, and compatible extension wands can expand capabilities while preserving surface safety. Try different tip sizes on a test patch first to calibrate speed and precision.
Maintenance and Safety Considerations for High-Pressure Systems
High-bar systems demand stricter maintenance and strict safety discipline. Inspect hoses for wear, replace worn seals, and ensure connectors are tight to avoid leaks. Use detergents only when appropriate and follow manufacturer directions for chemical compatibility. Never aim the wand at people, pets, or fragile surfaces, and keep high-pressure spray away from electrical outlets and outlets where water can pool.
Interpreting Manufacturer Specifications and Labels
Manufacturers publish bar, psi, and nozzle compatibility on product labels. Learn to read the fine print: the actual operating pressure at the nozzle can differ from the tested rating on the unit. Always verify the combination that includes nozzle size, flow rate, and duty cycle. If your task requires sustained pressure, prefer models with robust thermal management and solid warranty coverage to protect your investment.
Practical Setup Checklist Before A Big Clean
- Inspect hoses and connectors for wear. 2) Select the right nozzle for the task. 3) Test on a hidden patch to gauge surface reaction. 4) Adjust ventilation and drainage for chemical use if needed. 5) Wear protective gear and keep a safe working distance. 6) Plan for breaks to prevent overheating and to re-evaluate surface integrity.
Case Study: Bar Size in Action
In a recent home improvement project, a homeowner used a mid-range bar with a 15-degree nozzle to refresh a weathered concrete patio. The bar provided enough force to lift surface contaminants without etching the concrete, and the combination with a wide spray pattern kept cleaning time reasonable. The lesson: start mid-range, test, and adjust with care to optimize results without risking damage.
Feature Comparison
| Feature | Low-range (approx. 80-110 bar) | Mid-range (approx. 110-160 bar) | High-range (approx. 160-230+ bar) |
|---|---|---|---|
| Bar range (approx.) | 80-110 bar | 110-160 bar | 160-230+ bar |
| Best for surfaces | Delicate surfaces (vinyl, soft wood) | General cleaning (brick, stone, siding) | Heavy grime, paint removal, heavy stains |
| Surface safety risk | Low | Medium | High |
| Nozzle options compatibility | Wide range of nozzles | ||
| Water usage indication | Moderate | Higher | Highest |
| Typical price range | Budget-friendly | Mid-range | Premium |
Pros
- Clear mapping between bar size and cleaning power
- Broad task coverage across surface types
- Surface-safety-aware approach reduces damage risk
- Compatibility with multiple nozzle tips expands versatility
Cons
- Higher bars increase risk of surface damage if misused
- Equipment cost and maintenance rise with higher-bar systems
- Potentially more water usage and safety considerations if not managed properly
Mid-range bars offer the best balance for most homes; only move to high-range bars for stubborn grime with proper technique and surface testing
For everyday cleaning, start in the 110–160 bar range and adjust upward only after surface tests. Reserve 160–230+ bar for tough jobs with cautious application and the right nozzle.
Quick Answers
What is the best bar range for DIY homeowners?
For most DIY tasks, a mid-range bar in the 110–160 range provides a good balance of cleaning power and surface safety. Start there and adjust based on the surface and grime level. Always test on a hidden patch first.
For most DIY tasks, start with mid-range bars around 110 to 160, then adjust as needed after testing.
How many psi is 120 bar?
120 bar is approximately 1,740 psi. This conversion helps you compare to familiar PSI labels on consumer machines. Use it to gauge whether a given nozzle will deliver the right cleaning force without damaging surfaces.
120 bar is about 1,740 psi; use this to compare with standard psi labels.
Can I use high bar on soft surfaces like wood siding?
High bar can damage soft surfaces if used with the wrong nozzle or too close. Always start at a safe distance, test on a hidden area, and consider a wider-angle nozzle or a lower bar for wood siding.
Be careful—high bar on wood can gouge the surface. Test first and use the right nozzle.
How does nozzle size affect cleaning at a given bar?
Nozzle size concentrates or disperses the spray. A 15-degree nozzle increases cleaning intensity at the same bar, while a wider nozzle reduces impact. Always pair bar with an appropriate nozzle to control cleaning speed and surface safety.
The nozzle decides how focused the spray is. Pair the right nozzle with your bar for safe, effective cleaning.
Should I upgrade to a higher bar or replace the whole machine for tough jobs?
For occasional tough jobs, upgrading the bar or adding a compatible cleaner/detergent can help. Replacing the entire machine is usually overkill unless you frequently tackle extreme grime. Consider your regular tasks, budget, and warranty coverage.
Upgrade or add-ons can help for tough jobs; replace only if you regularly need extreme pressure.
What should I look for beyond bar when buying a machine?
Look for nozzle compatibility, GPM, safety features, warranty, and customer support. A model with balanced GPM and a reliable pump will perform better in real-world use than a higher bar alone.
Check nozzle options, flow rate, and warranty in addition to bar when buying.
Key Takeaways
- Start with mid-range bars for most tasks
- Match nozzle and bar for surface safety
- Test patches before full-clean to avoid damage
- Higher bars demand careful technique and PPE
- Consider GPM and nozzle choice alongside bar
- Read manufacturer specs and verify real-world performance