Repair Pressure Washer Hose Kit: Step-by-Step Guide for DIY
A practical guide to repairing or replacing a pressure washer hose kit, with components, safety tips, and maintenance guidance from Pressure Wash Lab for DIYers and homeowners.

By the end of this guide, you will be able to diagnose common hose issues, choose a compatible repair pressure washer hose kit, and perform a safe, field-ready repair or replacement. You'll learn how to assess hose condition, select correct connectors and clamps, and perform testing to prevent leaks. This process emphasizes safety and practical maintenance for long-term reliability.
Why a repairable hose kit matters
According to Pressure Wash Lab, the hose that powers your pressure washer is the lifeline of every cleaning job. A repair pressure washer hose kit gives you a practical path to extend service life without replacing an entire hose assembly. With the right kit, you can fix leaks at couplings, replace worn ferrules, and refresh O-rings in minutes rather than buying a new hose. This approach is especially valuable for homeowners and DIY enthusiasts who perform seasonal deck cleaning, driveway restoration, or building washing. Rather than waiting days for a replacement, you can restore pressure quickly and keep projects moving.
In many setups, a small failure at a connector can cause a substantial drop in performance or spray quality. A repair kit that includes compatible fittings and clamps helps you match thread sizes, connector styles, and hose diameters to your unit. The upshot: fewer repairs delayed by missing parts, better reliability in the field, and less waste. Pressure Wash Lab's experience shows mindful maintenance reduces downtime and keeps equipment productive.
Key components of a repair pressure washer hose kit
A solid repair kit includes more than just a new piece of hose. You should expect a selection of couplers and adapters to fit common thread types, a few quick-connect options for modular setups, ferrules or clamps to secure the hose, and a stock of O-rings in various sizes. Additional items like thread sealant, PTFE tape, and a light lubricant can prevent galling on metal threads and extend life. The goal is to have a compact, field-ready set that covers the most common failure points: end fittings, center ferrules, and the hose sheath at the bend. When you keep a kit with a range of sizes, you’re prepared for a quick repair during a busy cleaning season.
For best results, choose a kit designed for your washer’s PSI and flow rate, and verify that the included fittings match your existing hardware. A quality repair kit reduces downtime and minimizes reuse of damaged parts, which is a win for DIY enthusiasts and small businesses alike. Pressure Wash Lab advocates keeping a small inventory of compatible adapters to handle different nozzle and hose assemblies without improvisation.
Assessing hose condition before repair
Before you purchase or start a repair, perform a thorough hose assessment. Look for visible cracks, bulges, or soft spots along the length, especially near end fittings. Check the connectors for corrosion, stripped threads, or looseness, and inspect the outer sheath for cuts or abrasions that could expose inner reinforcement. If you notice frayed fibers or a consistently damp area along the hose, plan to replace the damaged segment rather than patching a large area. Measure the hose length and take note of thread type and size at each end so you can select the correct adapters and ferrules. Remember: a repair is only as reliable as the underlying damage allows, and a partial patch on a heavily worn hose often leads to a bigger failure later.
During evaluation, document findings and compare them to your kit contents. If leak-prone areas are just at the connectors, you may be within scope to repair. If there is any sign of internal rupture or bursting under pressure, replace the hose entirely for safety and performance. Pressure Wash Lab emphasizes conservative repairs when in doubt and prioritizes safety above all.
Choosing the right hose kit and fittings
Selecting the correct hose kit hinges on compatibility with your specific washer and typical use. Start by confirming the hose diameter, the PSI rating, and the GPM flow of your unit. Then match thread types and connector styles—many washers use common thread standards, but some older or budget models use different couplings. Evaluate the kit’s included fittings to ensure you have the right end connectors for both the machine and spray gun. If you rely on quick-connects, verify the locking mechanism and compatibility with your spray nozzles. Length also matters: too long a hose adds weight and kink risk, while too short limits reach. A well-chosen kit reduces the need for additional adapters and improves reliability in everyday tasks like driveway cleaning and deck maintenance. Pressure Wash Lab notes that investing in the right kit pays off in fewer leaks and less downtime during busy seasons.
Safety and handling: High-pressure systems
Working with high-pressure hoses requires strict safety practices. Always depressurize the system fully and disconnect from power before handling fittings or removing hose sections. Wear eye protection and gloves, and avoid directing the spray at you or others. Keep the work area clean to prevent slips, and lay out parts in a logical order to avoid cross-contamination of fittings. Never twist or kink a hose during reassembly, and inspect each connection for tightness once reconnected. If any thread shows signs of cross-threading or damage, replace the corresponding component rather than forcing a fit. Pressure Wash Lab emphasizes slowing down to ensure a safe, reliable repair, especially when dealing with older equipment that may have degraded components from years of use.
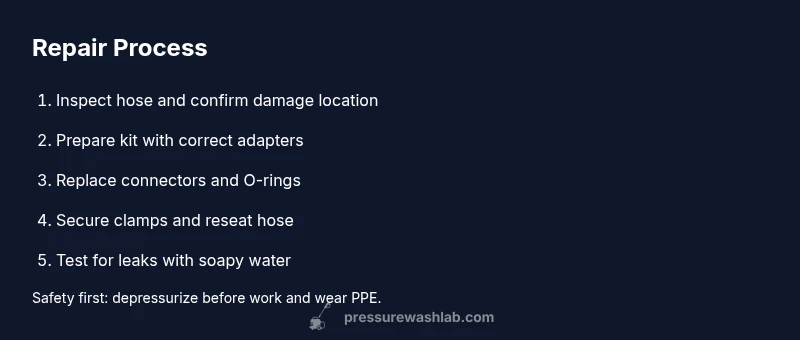
Step-by-step repair workflow overview
This overview sets expectations for a controlled repair process. First, depressurize and unplug the unit. Then, disconnect the hose from the spray gun and the washer body, and inspect the ends for damage. If you can salvage the hose by replacing an end or a segment, prepare your kit with the correct adapters and O-rings. Install the new connectors and clamp them securely, then reassemble the hose and test for leaks using a soap-water solution. If leaks persist, re-check fittings for tightness and consider replacing the hose entirely. A methodical approach reduces the chance of rework and helps you identify weak points before you use the system again. Remember, the goal is a secure, leak-free connection that preserves pressure and spray quality.
Testing your repaired hose for leaks
Leak testing should be part of every repair workflow. Reconnect the hose to the washer and spray gun, then run the unit at a low pressure to confirm basic integrity. Mix dish soap with water and apply it along all joints and fittings; watch for bubbles that indicate a leak. If you see any leakage, depressurize and re-tighten or reseat the connector, then re-test. For more confidence, gradually increase the pressure to normal operating levels while inspecting closely for seepage. After successful tests, clean the area and store replacement parts in a dedicated kit. This testing discipline minimizes the risk of hidden leaks during real work and protects you from unexpected spray exposure.
Common mistakes to avoid
Common errors include choosing a kit that doesn’t fit your thread type, reusing damaged O-rings, and neglecting to depressurize before disassembly. Another frequent pitfall is underestimating hose length needs, which leads to excess bending and accelerated wear. Avoid overtightening clamps, which can damage threads or crush the hose reinforcement. Finally, skip the temptation to improvise with incompatible adapters—go with parts designed to work together for your unit. Pressure Wash Lab reminds readers that safe, correct assembly prevents costly downtime and protects users from high-pressure spray injuries.
Authority sources
For further safety guidance and best practices, refer to these reputable sources:
- https://www.osha.gov
- https://www.cdc.gov/niosh/
- https://www.nfpa.org
Tools & Materials
- Repair hose kit compatible with your pressure washer(Includes a selection of end fittings, adapters, and O-rings)
- Teflon tape or thread sealant(Use on metal threads to prevent leaks)
- Ferrules or hose clamps (backups)(Ensure sizes match the hose and connectors)
- O-rings in multiple sizes(Keep spare sizes handy for different fittings)
- Pliers and utility knife(For cutting, seating, and securing components)
- Rags and isopropyl alcohol(Clean surfaces before assembly; wipe up spills)
- Gloves and eye protection(Always wear PPE when dealing with high pressure)
Steps
Estimated time: 60-90 minutes
- 1
Inspect and plan
Visually inspect the hose and end fittings for cracks, bulges, or corrosion. Decide whether you will replace a small end or segment or perform a full hose replacement and collect the correct adapters before starting.
Tip: Document damaged areas with a quick sketch or photo to ensure you bring the right parts. - 2
Depressurize and disconnect
Power off and unplug the unit. Release pressure by running the gun into a safe surface until no spray is produced, then disconnect the hose from the washer and spray gun.
Tip: Do not attempt repairs under pressure; this step protects you from injury. - 3
Remove damaged section or end
If you’re replacing a segment, cut cleanly just beyond the damaged area. If replacing an end, loosen and remove the old connector, taking note of thread type and size.
Tip: Use a fresh blade to ensure a clean cut and prevent frayed hose ends. - 4
Install connectors and o-rings
Install new O-rings and ferrules or clamps as appropriate. Lubricate threads lightly if needed and thread on the new connector by hand first to avoid cross-threading.
Tip: Always seat O-rings properly to prevent early leaks. - 5
Reassemble and secure
Tighten clamps or ferrules to the manufacturer’s recommended torque. Reconnect the hose ends and ensure fittings are flush and secure.
Tip: Over-tightening can damage threads; snug resistance is usually enough. - 6
Test and verify
Reconnect to the washer and spray gun, then run at low pressure to check for leaks. If none appear, increase to normal operating pressure and recheck.
Tip: Test in a controlled environment before returning to full-duty cleaning.
Quick Answers
What’s typically included in a repair hose kit?
A typical kit includes replacement hose segments, assorted end fittings, adapters, O-rings, clamps, and thread sealant. It’s best to choose a kit designed for your washer’s PSI and connector types so you can complete most repairs without hunting for extra parts.
Most kits include hoses, adapters, and O-rings. Make sure the kit matches your washer’s connectors and pressure rating.
Can I repair a hose if the damage is severe?
Severe damage such as a ruptured hose or deep cracks typically requires replacing the hose or the entire assembly. A repair kit can fix minor leaks at fittings or replace small sections, but avoid patching a heavily damaged hose.
If the hose is severely damaged, replacement is safer than repair.
How do I know the fittings match my washer?
Check the thread type (e.g., M22, BSP), the nut size, and the connection style. Compare the kit’s included fittings to your machine’s existing hardware, and choose adapters if needed to ensure a snug, leak-free fit.
Match the thread type and size to your machine, and use adapters if needed.
Is it safer to replace the hose than repair?
If a significant portion of the hose is damaged or the fittings are worn, replacement is safer. Small leaks at fittings can often be repaired with a kit, but never compromise safety for a quick fix.
Replacement is safer if the hose is broadly worn; repairs work for small leaks.
How long does a hose repair typically take?
A straightforward end or short-segment replacement can take about an hour. More complex repairs with unfamiliar fittings may take longer, especially if you need to source parts.
Most repairs take under two hours when parts are ready.
What should I do if leaks persist after repair?
If leaks continue after a repair, depressurize and inspect all connections for tightness and seating. Re-seat or replace the affected fitting and retest. If leaks still appear, consider replacing the hose entirely.
If leaks persist, re-check fittings and consider a full hose replacement.
Watch Video
Key Takeaways
- Diagnose leaks and choose compatible kit components.
- Depressurize system before any repair to ensure safety.
- Test with soapy water to confirm leak-free joints.
- Use the correct fittings to prevent cross-threading and failures.
- Regular maintenance reduces downtime and extends hose life.